
Trade-level tutorials, stories, and professional insights from Jewellery Training Solutions — learn from the bench with Peter Keep
The Greatest Gem Ever Found
Few stories in jewellery history capture the imagination quite like that of the Cullinan Diamond — the largest gem-quality rough diamond ever discovered. Weighing an astonishing 3,106.75 carats, this stone was found at the Premier No.2 mine in Cullinan, South Africa, on 26 January 1905.
At first, no one knew quite what to do with it. The diamond’s sheer size made it almost unbelievable — some even thought it was a crystal of quartz. But as news spread, the world’s fascination grew.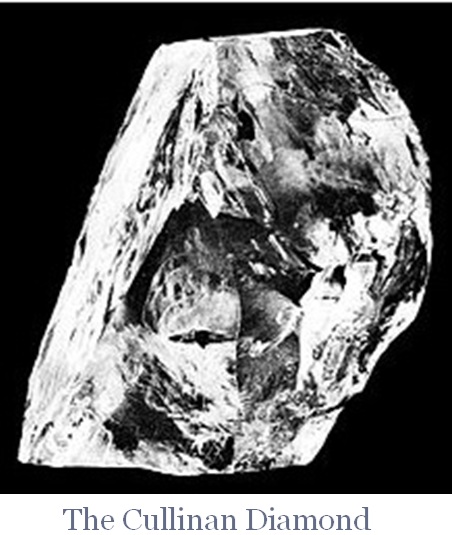
In April 1905, the Cullinan was sent to London for sale. Despite enormous interest, it remained unsold for nearly two years. Finally, in 1907, the Transvaal Colony government decided to purchase the diamond and present it as a gift to King Edward VII of the United Kingdom — a gesture of loyalty and goodwill.
The King entrusted the legendary Joseph Asscher & Co. of Amsterdam with the daunting task of cutting and polishing the rough stone into a collection of finished gems.
In a story fit for a spy novel, Abraham Asscher personally travelled to London to collect the diamond from the Colonial Office on 23 January 1908. He simply slipped the priceless gem into his coat pocket and boarded a train and ferry back to the Netherlands.
Meanwhile, to throw off would-be thieves, a Royal Navy ship sailed across the North Sea carrying an empty box under heavy guard — even the captain didn’t know that his “precious cargo” was a decoy.
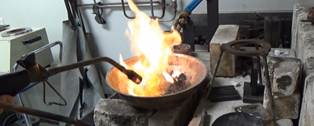
On 10 February 1908, Joseph Asscher prepared to cleave the Cullinan at his diamond-cutting factory in Amsterdam. The process was nerve-racking — no one had ever attempted to cut a diamond of that size, and there was no technology to guarantee success.
Asscher spent weeks studying the stone, mapping out its internal planes and flaws. He finally made an incision half an inch deep (1.3 cm) to guide the split — a task that alone took four days.
On the first attempt, the steel knife snapped. The second blow, however, struck perfectly — the diamond split cleanly in two along one of its natural cleavage planes.
From there, the work continued for eight months, with three craftsmen labouring 14 hours a day to cut and polish the fragments into brilliant gems of various sizes and shapes.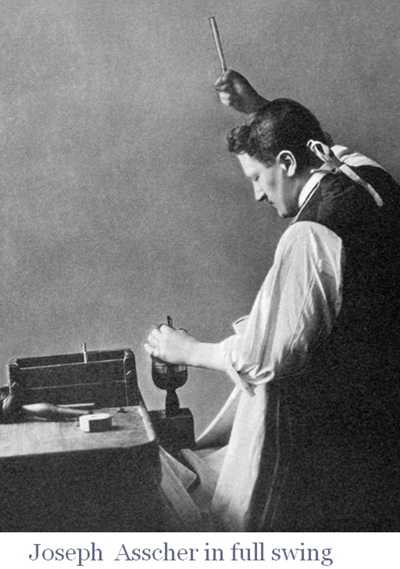
The dramatic moment of the split has inspired many retellings. In his book Diamond: A Journey to the Heart of an Obsession (2002), Matthew Hart wrote that Joseph Asscher was so overcome with tension that he had a doctor and nurse on standby — and fainted immediately after striking the diamond.
However, Lord Ian Balfour, author of Famous Diamonds (2009), suggests otherwise. He believes Asscher likely celebrated the success with a bottle of champagne instead.
Asscher’s nephew Louis later dismissed the fainting myth altogether, declaring:
“No Asscher would ever faint over any operation on any diamond.”
The Cullinan Diamond produced nine major stones and ninety-six smaller brilliants, including the Great Star of Africa (Cullinan I) — the 530.2-carat pear-shaped diamond that remains the largest cut diamond in the world.
Today, several of these stones are set in the British Crown Jewels, symbols of craftsmanship and courage — and a reminder of the human skill behind nature’s most breathtaking creation.
A Lesson from the Past
When I was training as a jeweller in Birmingham’s Jewellery Quarter back in the 1970s, there was a story every apprentice heard — part legend, part lesson — and it still makes me smile today.
It was about an old jeweller who had fallen on hard times during one of Britain’s tough economic downturns. After decades of trade, his once-bustling workshop had grown quiet. Orders dried up, rent piled high, and the time came to hand the keys over to the receivers.
As he stood in the doorway, about to lock up for the final time, a lump caught in his throat. That workshop had seen generations of goldsmiths — his father, grandfather, perhaps even great-grandfather — each leaving their mark in tiny scratches and dents across the old wooden benches.
Then, by sheer chance, he dropped his keys.
When he bent down to pick them up, something glimmered faintly between the cracks of the worn timber floorboards. Curious, he fetched a small blade and teased out what turned out to be a tiny piece of gold — a fragment he’d probably lost years earlier.
That small discovery sparked a thought. How much other precious metal might have fallen between the boards over the decades?
So, with nothing left to lose, he pried up a few floorboards. What he found stopped him in his tracks.
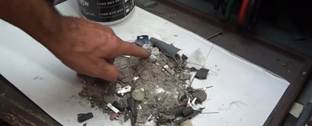
Underneath the boards lay years of bench dust, filings, lemel, and forgotten stones — a jeweller’s history written in dust. Over time, countless fragments of gold and silver had sifted through the cracks and settled in the cavities below.
He decided to delay the handover. Instead, he swept out every crevice, filled bags of floor sweepings, and sent them off to the Assay Office refinery in Birmingham.
When the results came back, the old jeweller couldn’t believe it. The precious metal recovered from his workshop floor was enough to clear his debts, reopen his doors, and keep his business alive through the recession.
Now, whether every detail of that story is true or not, it carries a real message that every jeweller understands:
“Nothing is ever truly lost in a jeweller’s workshop.”
The Birmingham Assay Office still confirms that many old workshops have yielded surprisingly valuable recoveries during renovations — even today. Years of filing, sawing, and polishing leave behind trace metals worth thousands of pounds.
For me, that old tale isn’t just about luck — it’s about resilience, resourcefulness, and the hidden value that comes from years of honest craft.
And every time I sweep my bench, I remember: there really is gold in them there floors.
By Peter Keep
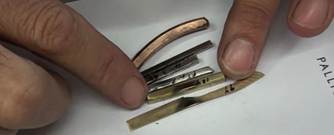
Every jeweller, whether apprentice or master, generates waste metal in the form of lemel, filings, off-cuts, and sweeps. These by-products may look insignificant day to day, but over time they represent a surprising amount of recoverable precious metal — gold, silver, platinum, or palladium. Efficient collection, storage, and refining of this material is not only good workshop practice but a crucial part of a professional jeweller’s profitability.
Filings are clean metal shavings and off-cuts that haven’t been contaminated and can be recycled in-house.
Lemel is the mixed dust and fine particles from filing or sawing, often combined with bench dust and abrasive residue, so it’s not recycled in-house.
Sweeps are the accumulated dust from floors, polishing machines, aprons, and extraction filters, usually containing traces of precious metal mixed with dirt and compounds.
Solid off-cuts from wire, sheet, or castings can be melted and re-rolled in-house if clean and of the same alloy. Always remove solder joins before remelting — solder lowers carat and contaminates the batch.
Proper preparation ensures the best return and a fair, transparent result from recovery.
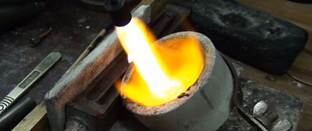
Remove as much non-metallic material as possible. If safe to do so, burn off polishing residues, paper, or fabric dust in a ventilated area or kiln.
⚠️ Refiners charge by initial weight. Cleaner material = more accurate and profitable recovery. Never burn plastics, rubber, or resin.
Ensure all waste is completely dry before sending it for refining.
Ask before shipping:
A disciplined approach — clean, dry, well-labelled, and well-documented material — ensures you recover maximum value from every gram of precious metal you produce.
Jewellery World Magazine — September 2025
By Alistair Snook
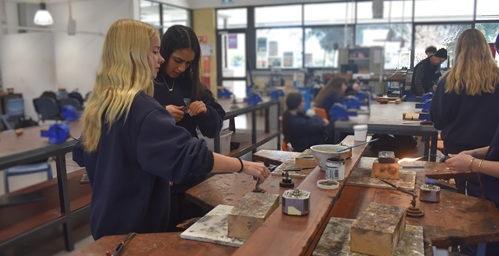
When you think of jewellery making, you might picture a private studio or trade workshop — but at Churchlands Senior High School in Western Australia, the jeweller’s bench has found its way into mainstream education.
It’s a place where design, craftsmanship, and learning come together — and where students discover the satisfaction of shaping metal, setting stones, and creating something of lasting value.
In 2015, Alistair Snook’s life took a new turn. After a career in woodwork programs and design technology, he began teaching at Churchlands Senior High School.
When the school introduced a Jewellery Program, led by colleague Robyn Hutchinson, Alistair saw a chance to combine his love for design with hands-on making. Over the last six years, he’s guided students through every step of jewellery creation — from design and casting to setting and finishing.
“The idea of inspiring students and seeing them find confidence through making things by hand really appealed to me. Watching them learn to shape metal, problem-solve, and see their ideas come to life is incredibly rewarding.”
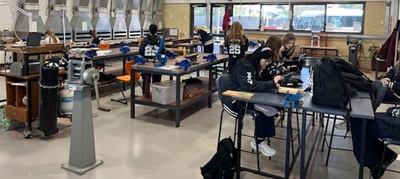
The Churchlands program introduces students to a wide range of tools, techniques, and design principles — while also exploring sustainability and materials innovation.
Students learn practical skills like soldering, stone setting, and metal forming, while also developing creative design ideas. They even tackle modern design challenges such as using recycled materials and exploring environmental responsibility in jewellery manufacturing.
Bringing jewellery into the school curriculum can be challenging — especially when specialist trade resources are limited. That’s where Jewellery Training Solutions (JTS) has become an invaluable teaching partner.
“Peter Keep’s website has been a game-changer,” Alistair explains. “It’s not just an incredible library of lessons — it’s a ready-made resource for classroom projects, manufacturing techniques, and even assessment ideas. It’s like having a virtual mentor in the workshop.”
JTS tutorials have helped teachers bring trade-level training into the classroom — giving students access to real-world techniques normally reserved for apprentices and professional jewellers.
Alistair says the results speak for themselves.
“After three years, the students’ work has reached a standard I never imagined possible in a school setting. Watching them produce rings, pendants, and settings that rival commercial work is amazing.”
The Churchlands jewellery program has inspired other educators to explore how hands-on design and trade-based learning can boost creativity, confidence, and problem-solving skills in students.
Whether it’s designing a pendant, soldering a ring, or setting their first stone, these young makers are learning more than just technique — they’re developing patience, focus, and pride in what they create.
“When students realise they can make something by hand that’s beautiful and lasting, it changes their confidence completely,” says Alistair. “That’s the power of combining education with craftsmanship.”
To explore the same professional training resources used by Churchlands Senior High School, visit:
👉 JTS Schools Program
Professional trade-level training for jewellers and educators worldwide.
Expanding Global Jewellery Training Reach
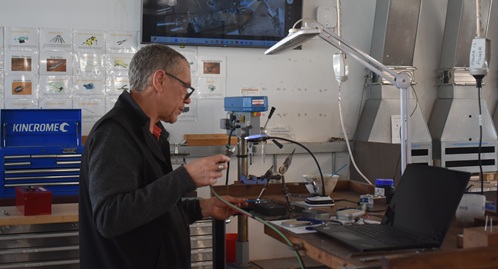
 When I started Jewellery Training Solutions, my goal was simple — to make professional trade-level jewellery education accessible anywhere in the world.This year, that goal came to life on a global scale. The JTS Teaching Tour 2025 took me from the southern hemisphere to the northern, meeting jewellers, students, and educators who share the same passion for craftsmanship and skill development.
The tour has included stops across New Zealand, Sydney, the Philippines, Victoria BC, Vancouver, Lancaster, Bristol, and Surrey (UK) — each with its own flavour of creativity and enthusiasm.
Every workshop has focused on what I love most: stone setting and ring making — the foundation of every professional jeweller’s journey.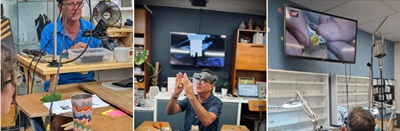
In each city, I’ve had the privilege of teaching students not just how to make jewellery, but why precision, patience, and understanding metal behaviour matter. Whether working with apprentices in a local studio or professionals refining their technique, the energy has been the same — a shared commitment to mastering the craft.
One of the most rewarding parts of this tour has been seeing how JTS online training connects with in-person learning.
Students who first discovered JTS through video courses are now attending workshops to refine their skills at the bench.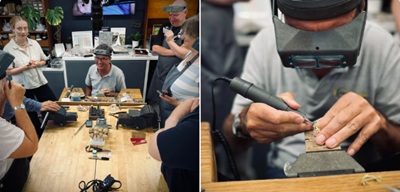
In places like the Philippines, it’s been inspiring to see studios such as Stairway Studio embracing hands-on training.
In Canada, reconnecting with the Thinkific team in Vancouver was a reminder of how technology continues to make professional training accessible worldwide.
And in the UK, it’s been a privilege to see how many jewellers are using JTS lessons to grow their skills, confidence, and careers.
The tour has reaffirmed one thing — trade-level jewellery education is more relevant than ever.
The tools may change, the techniques may evolve, but the principles remain the same: clean work, control at the bench, and respect for the craft.
It’s a joy to see these values resonate with students from every corner of the world.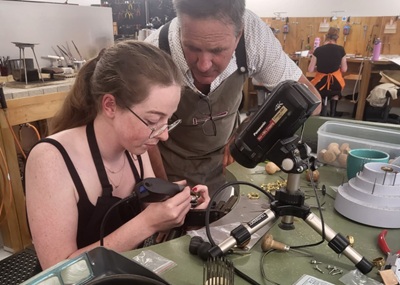
The JTS Teaching Tour continues to grow, with new destinations being planned and collaborations forming around the globe.
Whether you’re a beginner, a teacher, or a professional jeweller looking to refine your skills, JTS is here to help you reach that next level.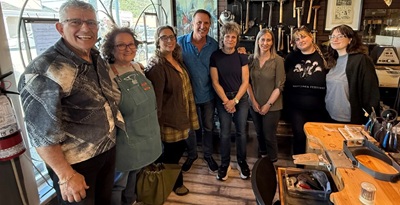
Stay up to date with new tutorials, upcoming masterclasses, and trade-level jewellery training opportunities around the world.
Visit here for future tour updates: JTS Facebook Page
By Peter Keep – Jewellery Training Solutions
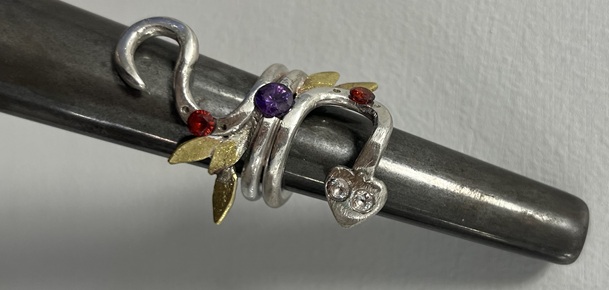
Gemstone setting is one of the most exciting stages in jewellery making — and for many students, it’s the moment they’ve been waiting for. But before you dive into pave or grain setting, it’s essential to master the fundamentals.
That foundation begins with claw setting. It’s the skill that every professional setter builds upon — the core technique that teaches precision, control, and confidence at the bench.
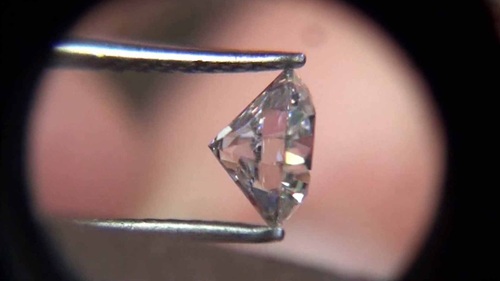
In this tutorial, we’ll walk through a step-by-step process for setting a 6 mm CZ into an SB1 setting blank (available through Jewellery Training Solutions). These specially made blanks are perfect for practice — allowing you to develop real trade skills without the pressure of working on a customer’s piece.
![]()
Always begin by examining your stone and setting. Check the stone’s profile and proportions, and look for any weak areas. Make sure your claws are positioned at North, South, East, and West and that they’re level. The stone should sit halfway down the claws. Clean and polish the setting before starting.
Every setting style aims to achieve two things:
Measure from the top of the claw to the stone’s girdle using dividers — this marks the ideal seat depth. Each claw should be marked individually to maintain precision.
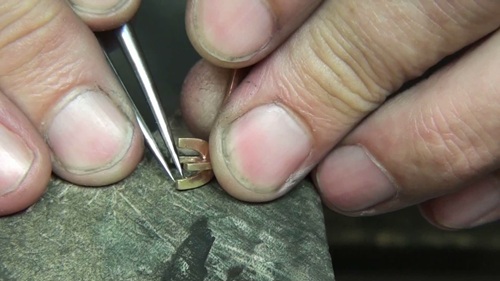
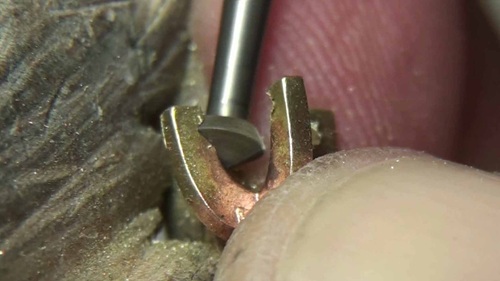
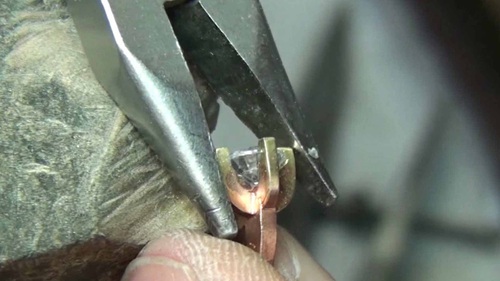
Using a fine 4/0 saw blade, carefully cut into your markings — no deeper than one-third of the claw’s thickness. While a setting bur can be used, I prefer a hart bur, which gives better control and preserves more metal for shaping.
Start with a bur that cannot pass between the claws — this prevents “bur rip” (when the bur catches and damages the claw). Keep the bur square and steady, cutting halfway into the claw’s thickness. Always make sure the bur is spinning before it contacts the metal.
Tilt the bur slightly inward to create the undercut that matches your stone’s pavilion. Work with the setting in your fingers rather than a clamp — this gives you greater tactile feedback and control while cutting.
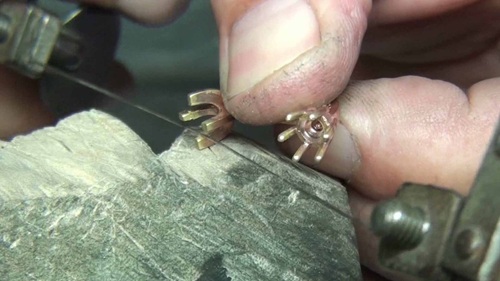
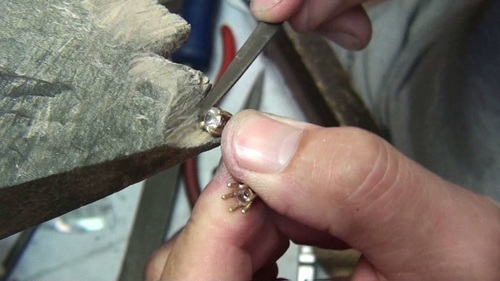
Check that the seat matches the stone’s profile. If the girdle is thick, refine the seat with a fine tapered bur. Remove any metal “swarf” before placing the stone to ensure a clean fit.
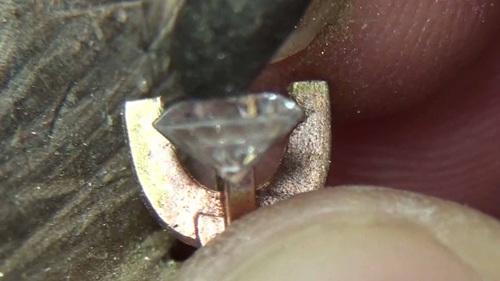
Before setting, prepare the metal for final polish. Gently bend back two adjacent claws using chain-nose pliers (with smoothed tips). Test-fit the stone using a fingernail or wooden dowel to avoid damage. Adjust as needed until the stone sits neatly into position.
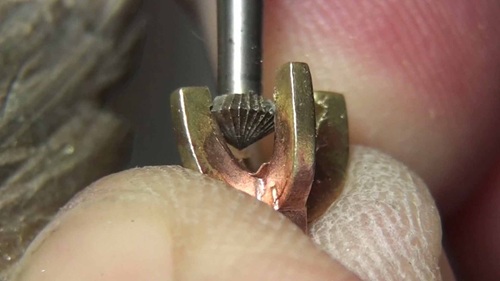
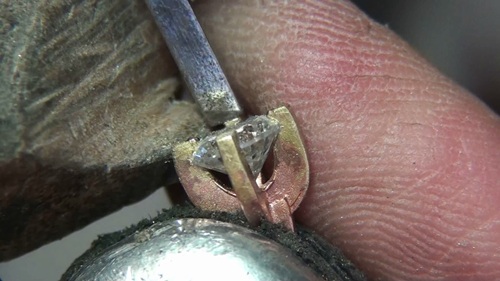
Push the claws gradually and evenly onto the stone’s crown facets, alternating sides to keep the stone level. For thicker claws, use setting pliers — the resting jaw stabilises one claw while you gently lever down the opposite one.
Check the symmetry and ensure the claws rest on the crown break facets. Once you’re happy, apply gentle downward pressure until the stone is fully secured. With experience, you’ll achieve tight, gap-free seats every time.
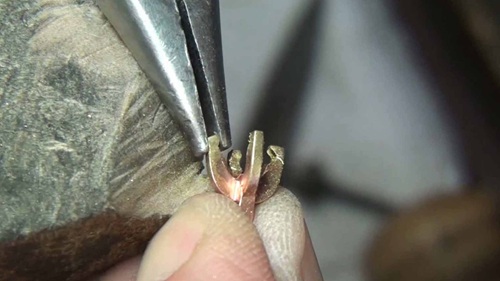
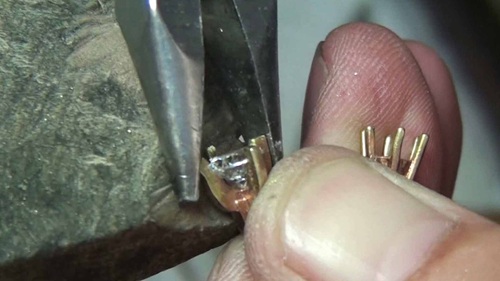
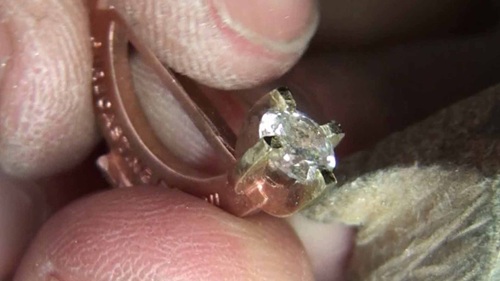
Trim the claw tips with a fine needle file (use one with a safety edge to avoid chipping). For practice, leave the tips square; for commissions, discuss the preferred shape with your client. Smooth any sharp edges that might catch on clothing.
Use a custom-made V-tip steel pusher to close and burnish the claw tips. This technique both seals the tip and work-hardens the metal. Be careful with polishing tools — buff sticks or abrasive disks can easily scratch the stone if they touch.
Examine your finished setting like a customer would. Your checklist for professional results:
Claw setting is the foundation of every professional setter’s journey — and once mastered, it opens the door to advanced techniques like grain, pave, and channel setting.
Explore the JTS Stone Setting Courses at Jewellery Training Solutions.


